
A stainless steel tumbler may look simple, but producing a reliable vacuum-insulated product requires multiple controlled manufacturing stages.
Quick Answer
Stainless steel tumblers are typically made through:
Material preparation → body forming → trimming and shaping → welding → cleaning → double-wall assembly → vacuum processing → polishing → surface finishing → logo application → component assembly → inspection and packaging
The exact sequence and equipment vary according to the tumbler structure, factory process and performance requirements.
For B2B buyers, understanding this process matters because a problem at any stage can affect insulation, leakage, lid fit, coating, appearance and consistency across bulk and repeat orders.
Stainless Steel Tumbler Manufacturing Process at a Glance
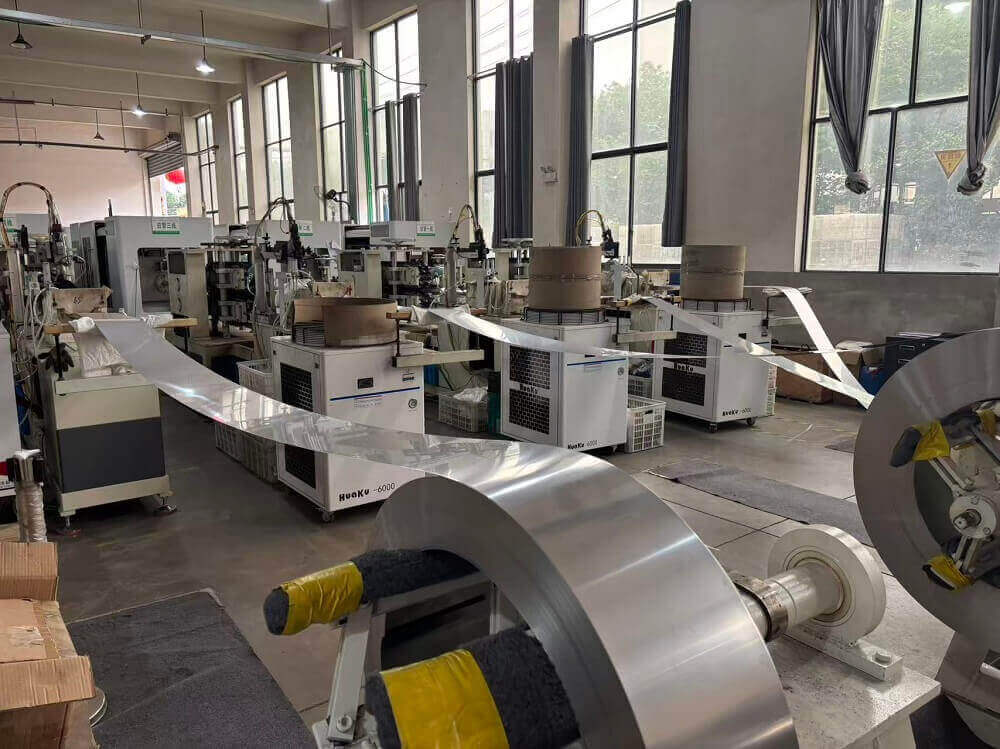
| Stage | Typical operation | Main control point |
|---|---|---|
| Material preparation | Stainless steel material is prepared | Grade, thickness and traceability |
| Body forming | Inner and outer walls are shaped | Dimensions and wall consistency |
| Trimming and shaping | Mouth, body and base are refined | Alignment and lid fit |
| Welding | Applicable components are joined | Weld integrity |
| Cleaning | Oil and production residue are removed | Surface cleanliness |
| Double-wall assembly | Inner and outer shells are joined | Alignment and sealing |
| Vacuum processing | Air is removed and the vacuum space is sealed | Insulation consistency |
| Surface preparation | The exterior is polished and cleaned | Coating adhesion and appearance |
| Surface finishing | Color or another finish is applied | Finish and batch consistency |
| Logo application | Branding is added | Position, appearance and durability |
| Final assembly | Lid, gasket, handle and accessories are fitted | Function and completeness |
| Inspection and packaging | Product and packaging are checked | Compliance with the approved specification |
Material Preparation
Most insulated stainless steel tumblers use 304 stainless steel for the inner wall because it offers a practical combination of corrosion resistance, durability and formability.
The outer wall may use 201 or 304 stainless steel depending on the design, performance requirements and target cost. Some projects may specify 316 stainless steel for the inner wall when stronger corrosion resistance is commercially justified.
However, a stainless steel grade alone does not prove that the complete product complies with every food-contact requirement.
Finished-product compliance should consider:
- Inner-wall material
- Lid and straw
- Silicone gasket
- Internal coating, if any
- Intended beverage
- Conditions of use
- Destination market
B2B buyers should confirm the materials by component rather than judging quality from the appearance of a finished tumbler.
For more information, see the TOPNOVO guide to 304 vs. 316 stainless steel for drinkware.
Forming the Inner and Outer Walls
A vacuum-insulated tumbler normally contains two stainless steel walls:
- Inner wall: The surface that contacts the beverage
- Outer wall: The visible exterior of the tumbler
Stainless steel material is formed into the required shape through processes selected for the product’s structure and capacity. These may include cutting, deep drawing, stretching or other forming operations.
Dimensional control is important because variation at this stage can later affect:
- Lid fit
- Handle assembly
- Wall alignment
- Product balance
- Packaging dimensions
- Consistency during repeat production
A small dimensional difference may not be obvious when one tumbler is examined alone. It can become more visible when lids, handles or packaging inserts are fitted across a large order.
Critical dimensions should therefore be checked against approved specifications during production.
Trimming, Shaping and Structural Preparation
After forming, the inner and outer components may require trimming and further shaping.
This stage helps control the mouth, base, rim and overall geometry before the double-wall structure is completed.
Important checkpoints can include:
- Overall height
- Body diameter
- Base diameter
- Mouth dimensions
- Roundness
- Alignment
- Edge condition
These dimensions are particularly important when the product uses a fitted lid, handle or accessory.
Welding and Double-Wall Assembly
The relevant stainless steel components are joined to create the tumbler’s double-wall structure.
Welding and assembly consistency matter because defects at this stage can affect structural integrity, appearance and later vacuum performance.
Two tumblers can look almost identical externally while having different internal production consistency. A good showroom sample therefore does not automatically prove that the same result can be reproduced across thousands of units.
Buyers should evaluate the production and inspection process—not only the appearance of the first sample.
Cleaning Before Vacuum and Finishing
Manufacturing processes can leave oil, dust, polishing residue or other contamination on stainless steel surfaces.
The components must be cleaned at appropriate stages before vacuum processing, coating or final assembly.
Insufficient cleaning may contribute to:
- Surface contamination
- Uneven coating
- Poor coating adhesion
- Visible marks
- Odor concerns
- Inconsistent appearance
Cleaning requirements depend on the product structure and factory process, but surface preparation should not be treated as a cosmetic afterthought.
How Is Vacuum Insulation Created?
Quick Answer
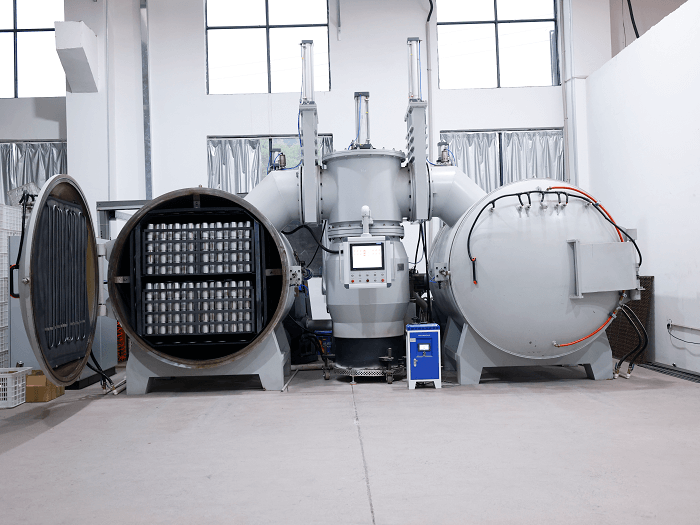
A vacuum-insulated tumbler uses two stainless steel walls with a low-pressure space between them. Removing most of the air from this space reduces heat transfer, helping the tumbler keep beverages hot or cold for longer.
After the double-wall structure is assembled, air is removed from the space between the walls and the vacuum opening is sealed.
Depending on the product and manufacturing process, additional insulation-enhancing treatments may also be used.
The thermal performance of a finished tumbler can depend on:
- Vacuum quality
- Capacity
- Body structure
- Lid design
- Opening size
- Starting liquid temperature
- Ambient conditions
- Test duration
Buyers should therefore avoid relying only on general claims such as “12 hours hot” or “24 hours cold.”
Temperature-retention claims should be supported by testing on the actual approved product under defined conditions.
Polishing and Surface Preparation
Before coating or decoration, the exterior surface is prepared to achieve the required appearance and support the selected finish.
Depending on the product, this may involve polishing, cleaning or other surface-treatment steps.
Poor surface preparation can contribute to:
- Uneven coating
- Dust or visible particles
- Weak adhesion
- Scratches
- Inconsistent texture
- Differences between production batches
This becomes especially important when a brand sells several colors as one coordinated collection.
Color and Surface Finishing
Common tumbler finishes include:
- Powder coating
- Spray painting
- Matte or glossy finishes
- Gradient effects
- Plating
- Sublimation coating
- Brushed or polished stainless steel
Powder coating is widely used because it can provide a durable finish, comfortable grip and strong color presentation. However, the appropriate finish depends on the product’s use, target market, logo method, cleaning instructions and price positioning.
For custom colors, buyers should define:
- Pantone reference
- Matte, glossy or textured appearance
- Acceptable color variation
- Approved sample
- Batch-matching requirement
- Lid and accessory colors
Explore TOPNOVO’s custom drinkware colors, finishes and branding options.
Logo and Branding Application
The logo or artwork is normally applied after the appropriate surface preparation or finishing stage.
| Method | Suitable application | Main advantage |
|---|---|---|
| Laser engraving | Premium, permanent marking | Clean and durable |
| Screen printing | Simple logos and volume orders | Cost-effective |
| UV printing | Detailed or multicolor artwork | High visual flexibility |
| Sublimation | Full-color wrap designs | Large decoration area |
There is no single logo process that is best for every tumbler.
The correct method depends on:
- Artwork
- Surface finish
- Number of colors
- Logo size
- Decoration area
- Order quantity
- Durability requirement
- Target price
Before mass production, confirm the logo method, dimensions, position, orientation, color and artwork version on the approved sample or production proof.
Lid and Component Assembly
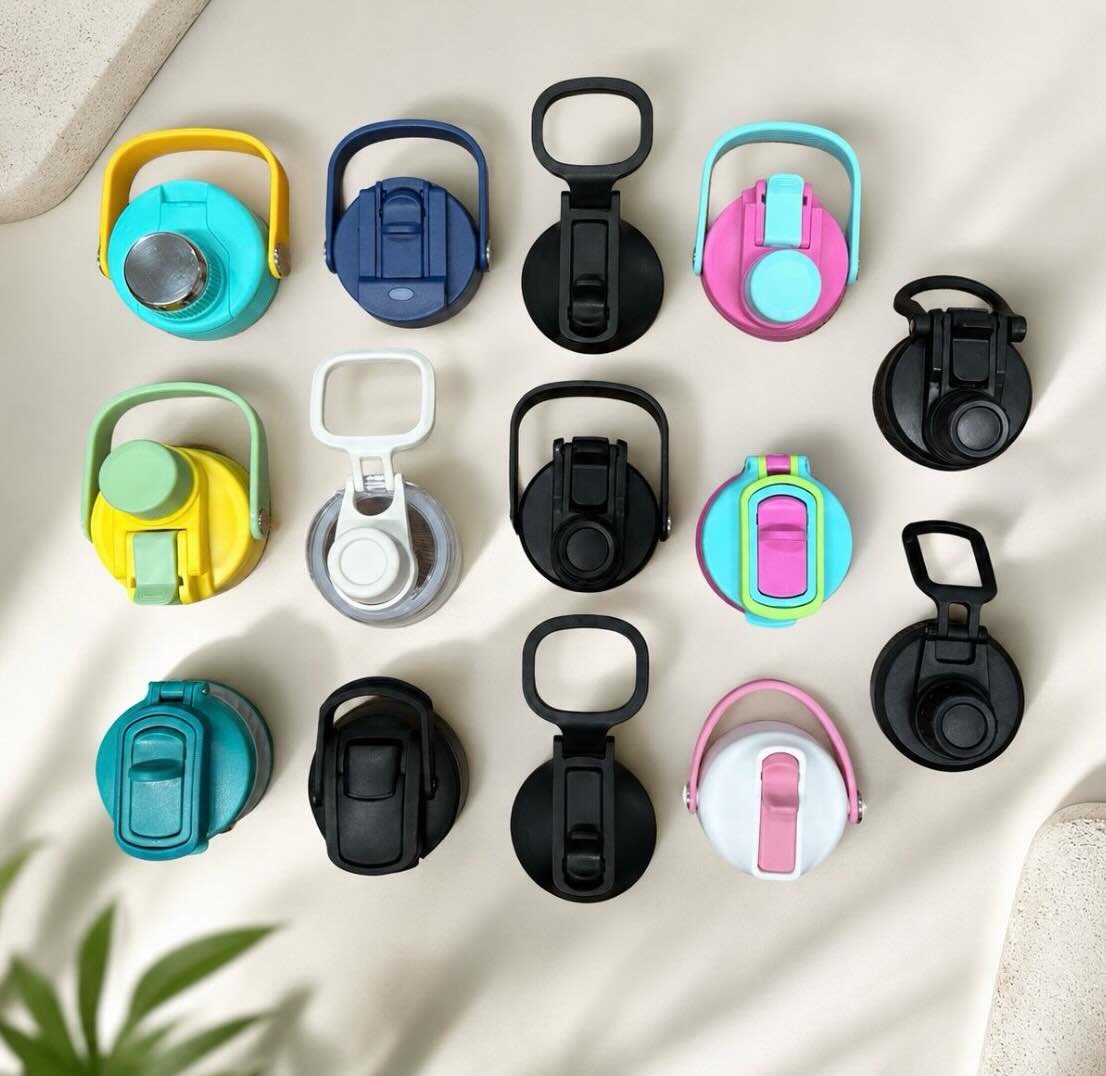
The tumbler body is only one part of the finished product.
Final assembly may include:
- Straw lid
- Flip lid
- Sliding lid
- Handle
- Straw
- Silicone gasket
- Cleaning brush
- Other accessories
The lid deserves particular attention because it affects drinking comfort, leakage, cleaning and portability.
Leakage can depend on several components working together:
- Lid-to-body fit
- Silicone-gasket position
- Threads
- Straw opening
- Air vent
- Plastic-part tolerances
- Assembly consistency
An existing lid can usually support a faster product-development route. A completely new lid, handle or structural component may require engineering, prototyping, tooling and additional testing.
What Are the Main Manufacturing Risks?
| Risk | Possible causes | Buyer control point |
|---|---|---|
| Vacuum failure | Vacuum or sealing inconsistency | Defined insulation test |
| Lid leakage | Gasket, fit, tolerances or assembly | Product-specific leak test |
| Color variation | Coating setup or batch differences | Approved color reference |
| Logo variation | Fixture, position or process inconsistency | Approved artwork and position |
| Coating defects | Preparation, coating or handling | Appearance and adhesion checks |
| Assembly errors | Incorrect or missing components | Assembly and packaging inspection |
| Shipping damage | Insufficient individual or carton protection | Approved packaging specification |
These risks should be controlled during production. Final inspection alone cannot efficiently correct a defect that has already affected an entire order.
How Are Stainless Steel Tumblers Tested?
Quality control should occur throughout manufacturing rather than only after production is complete.
Typical inspection areas include:
- Material and dimensions
- Vacuum and insulation
- Lid fit and leakage
- Surface and color
- Coating adhesion
- Logo appearance
- Component assembly
- Packaging and carton information
A practical control sequence is:
Approved sample → first-article confirmation → in-process inspection → final inspection
This section intentionally provides an overview. Exact sample sizes, test conditions and acceptance criteria should be defined in a product-specific quality plan.
For detailed testing information, see TOPNOVO’s drinkware quality-control process.
How Long Does Tumbler Production Take?
Lead time depends on the model, customization, order quantity, packaging, tooling and approval process.
Indicative planning ranges for selected projects may include:
| Project stage | Reference range | Timing normally begins after |
|---|---|---|
| Existing sample | 2–3 days | Model and delivery details are confirmed |
| Customized sample | 5–10 days | Specifications and artwork are confirmed |
| Standard bulk production | 25–35 days | Deposit and final approvals are received |
| New component tooling | Project-specific | Drawings and tooling plan are approved |
These are planning references, not unconditional guarantees. Final timing must be confirmed for each project.
Adding a logo to an existing tumbler is very different from developing a new lid or handle. Buyers should compare lead times only after suppliers have confirmed the same project scope.
What Should Buyers Confirm Before Mass Production?
Before approving a bulk order, confirm:
- Product model and capacity
- Critical dimensions and tolerances
- Inner- and outer-wall materials
- Lid, gasket, straw and handle
- Color and surface finish
- Logo method, size and position
- Individual and master-carton packaging
- Quantity by SKU and color
- Testing and inspection requirements
- Approved sample and specification version
- Production lead-time starting point
- Required delivery date
Clear specifications reduce unnecessary sample revisions, misunderstandings and production delays.
How to Choose a Stainless Steel Tumbler Manufacturer
Do not evaluate a manufacturing partner only by the lowest quotation.
Consider:
- Relevant manufacturing capability
- Product-development support
- Lid and component experience
- Customization options
- Quality-control system
- Compliance support
- Packaging capability
- Production capacity
- Repeat-order control
- Communication
One of the most important questions is:
What happens if the product sells well?
Can the manufacturer scale production while maintaining the approved materials, dimensions, color, logo, lid performance and packaging?
For commercial sourcing options, explore TOPNOVO’s custom stainless steel tumbler manufacturing service.
Final Takeaway
The stainless steel tumbler manufacturing process is not simply:
Stainless steel → finished tumbler
It is a controlled sequence:
Material → forming → welding → vacuum processing → surface finishing → branding → assembly → quality control
Each stage can affect the appearance, function and consistency of the finished product.
TOPNOVO operates a 24,000㎡ manufacturing base with annual capacity exceeding nine million units and 16 full-time QC staff. However, the real objective for a B2B buyer is not simply to find a factory that can produce one attractive sample.
The objective is to create an approved specification that can be reproduced consistently across bulk and repeat orders.
Planning a custom tumbler project? Send us your product reference, capacity, quantity, lid, color, logo, packaging and target delivery date.
Request a Tumbler Sample or Start Your Project.
Better Drinkware. Easier Business.